Follow this guide to build a high-performance web service that’s completely free to run forever. We’ll use Hugo (static site generator), GitHub (version control), and Cloudflare Pages (free hosting).
TL;DR: Quick Summary
- Cost: Server, hosting, SSL, CDN — all completely free
- Tech Stack: Hugo + GitHub + Cloudflare Pages
- Time Required: About 30 minutes to launch your own blog
- Key Benefits: 100% data ownership, no platform shutdown risk, unlimited customization
Table of contents
Table of Contents
- Why Free Web Hosting is Possible
- Tech Stack Overview
- Prerequisites
- Installing Hugo
- Creating a Project
- Installing a Theme
- Configuration File Setup
- Creating Your First Content
- Testing Locally
- Uploading to GitHub
- Deploying with Cloudflare Pages
- Conclusion
- References
Why Free Web Hosting is Possible
It’s easy to assume running a web service means paying for a server. Not with Hugo + GitHub + Cloudflare Pages:
- $0 Server Costs: Static sites don’t need a server
- Free Hosting: Cloudflare Pages free plan offers unlimited bandwidth
- Auto Deploy: Just git push and it updates automatically
- Global CDN: Fast speeds from anywhere in the world
- Free SSL: HTTPS is automatically enabled
Comparison with Other Platforms
| Comparison | Traditional Blogs | Hugo + GitHub |
|---|---|---|
| Cost | Free | Free |
| Customization | Limited | Unlimited |
| Data Ownership | Platform owns | 100% yours |
| SEO Control | Platform policy | Full control |
| Service Shutdown Risk | Exists | None |
| Developer Branding | Difficult | Portfolio ready |
| Difficulty | Easy | Initial setup required |
Why Choose Hugo
Complete Ownership: Your content, your data, your domain. Platform shutdown doesn’t affect you.
Developer Branding: A tech blog on your GitHub profile serves as a portfolio.
Real Skills: Naturally learn Git, CI/CD, Markdown and other industry skills.
Multilingual Support: Easy to build multilingual sites for global audiences.
This guide is based on Hugo’s Official Quick Start and Cloudflare Pages Documentation.
Tech Stack Overview
Here’s a quick look at the three core technologies.
 Free deployment pipeline combining Hugo, GitHub, and Cloudflare
Hugo: Static Site Generator
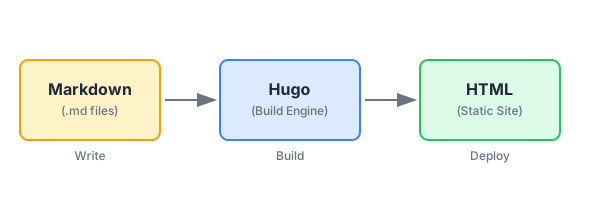 Markdown files are converted to HTML through the Hugo engine
Hugo is the world’s fastest static site generator, written in Go.
| Feature | Description |
|---|---|
| Build Speed | Thousands of pages in under 1 second |
| Writing | Simple Markdown syntax |
| Themes | Hundreds of free themes available |
| Security | No database = minimal hacking risk |
GitHub: Version Control & Storage
Git tracks code change history, and GitHub stores it safely in the cloud.
- Restore to any previous version if something goes wrong
- Work across multiple devices with sync
- Connect to Cloudflare for automatic deployment
Cloudflare Pages: Free Hosting & Auto Deploy
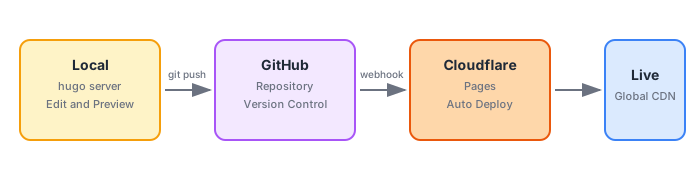 Push to GitHub and Cloudflare automatically builds and deploys
Cloudflare Pages connects to your GitHub repository to automatically build and deploy worldwide.
| Free Plan Benefits | Details |
|---|---|
| Cost | Completely free |
| Bandwidth | Unlimited |
| SSL | Automatic HTTPS |
| CDN | Global edge network |
Prerequisites
| Item | Required | Notes |
|---|---|---|
| macOS / Windows / Linux | Required | This guide uses macOS |
| Terminal | Required | For running commands |
| GitHub Account | Required | Free signup |
| Cloudflare Account | Required | Free signup |
| Code Editor (VS Code, etc.) | Recommended | For convenient content writing |
Prerequisites done. Time to set up Hugo.
Installing Hugo
macOS (Using Homebrew)
Open Terminal and run these commands in order.
1. Install Homebrew if you don’t have it:
/bin/bash -c "$(curl -fsSL https://raw.githubusercontent.com/Homebrew/install/HEAD/install.sh)"
2. Install Hugo:
brew install hugo
3. Verify installation:
hugo version
You should see output similar to:
hugo v0.154.3+extended+withdeploy darwin/arm64 ...
Windows
Windows users, please refer to the official installation guide.
Creating a Project
# Create new Hugo site (in blog folder)
hugo new site blog

# Move to created folder
cd blog
Project Structure
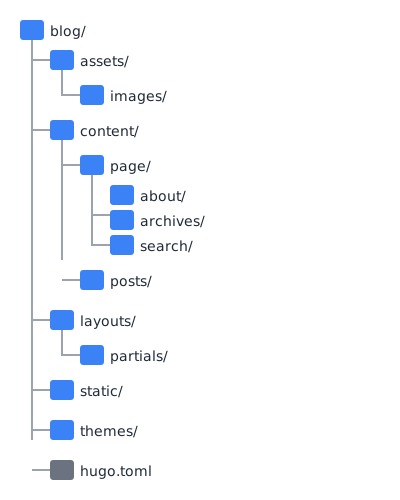 Basic folder structure of a Hugo project
| Folder/File | Purpose |
|---|---|
content/ | Where content is stored |
content/page/ | Static pages (About, Search, etc.) |
content/posts/ | Blog posts |
assets/ | Resources that need processing (images, SCSS) |
static/ | Static files (favicon, logo, etc.) |
layouts/ | Custom templates |
themes/ | Theme files |
hugo.toml | Main configuration file |
Installing a Theme
Browse Hugo Themes to find one you like. Hundreds of free themes are available.
Recommended Themes
| Theme | Features | Best For |
|---|---|---|
| Stack | Sidebar, widgets, card design | Ads/widgets |
| PaperMod | Simple, fast, popular | Minimal design |
| Blowfish | Modern, various layouts | Stylish design |
This site uses the Stack theme. It’s great for placing ad widgets in the sidebar and has well-organized archives/tags.
Why Use Git Submodule
Important: Always install themes using Git Submodule.
As recommended in Hugo’s official documentation:
- Separates theme code from your project code
- Easy updates with
git submodule update - Required for Cloudflare Pages deployment (regular copy causes errors)
Installation Commands
Stack theme (used on this site):
# Initialize Git repository
git init

# Add Stack theme as submodule
git submodule add https://github.com/CaiJimmy/hugo-theme-stack.git themes/hugo-theme-stack
Configuration File Setup (hugo.toml)
Open hugo.toml and replace with the following content. Comments explain each setting.
# ============================================
# Basic Settings
# ============================================
baseURL = 'https://yourdomain.pages.dev/'  # Change to actual URL after deployment
title = 'My Tech Blog'                      # Site title
theme = 'hugo-theme-stack'                  # Theme to use

# ============================================
# Language Settings
# ============================================
defaultContentLanguage = 'en'              # Default language: English
defaultContentLanguageInSubdir = true      # Use /en/, /ko/ prefixes in URL
enableRobotsTXT = true                     # Auto-generate robots.txt

# ============================================
# Search Feature (hugo-theme-stack built-in)
# ============================================
[outputs]
  home = ["HTML", "RSS", "JSON"]           # JSON required for search

# ============================================
# Language-specific Settings
# ============================================
[languages]
  # --- English ---
  [languages.en]
    languageCode = 'en-US'
    languageName = 'English'
    weight = 1

    [languages.en.params]
      description = 'Developer Tech Blog'
      mainSections = ["posts"]

    [[languages.en.menu.main]]
      name = "Archive"
      url = "/archives/"
      weight = 10
    [[languages.en.menu.main]]
      name = "Tags"
      url = "/tags/"
      weight = 20
    [[languages.en.menu.main]]
      name = "Search"
      url = "/search/"
      weight = 30

  # --- Korean ---
  [languages.ko]
    languageCode = 'ko-KR'
    languageName = '한국어'
    weight = 2

    [languages.ko.params]
      description = '개발자의 기술 블로그'
      mainSections = ["posts"]

    [[languages.ko.menu.main]]
      name = "Archive"
      url = "/archives/"
      weight = 10
    [[languages.ko.menu.main]]
      name = "Tags"
      url = "/tags/"
      weight = 20
    [[languages.ko.menu.main]]
      name = "Search"
      url = "/search/"
      weight = 30

# ============================================
# Stack Theme Settings
# ============================================
[params]
  # Site basic info
  description = 'Developer Tech Blog'
  mainSections = ['posts']

  # Sidebar settings
  [params.sidebar]
    emoji = ''
    subtitle = 'Dev Blog'

    [params.sidebar.avatar]
      enabled = true
      local = true
      src = 'images/avatar.webp'

  # Comments (enable later)
  [params.comments]
    enabled = false

  # Footer settings
  [params.footer]
    since = 2026

  # Color settings
  [params.colorScheme]
    toggle = true
    default = 'auto'
Creating Your First Content
Creating Required Pages
Stack theme needs a few pages to work properly:
# Archive page (post list)
cat > content/archives.md << 'EOF'
---
title: "Archive"
layout: "archives"
summary: "archives"
---
EOF

# Search page
cat > content/search.md << 'EOF'
---
title: "Search"
layout: "search"
summary: "search"
---
EOF
Writing Your First Post
Using Leaf Bundle style (folder + index.md) makes image management easier:
# Create new post folder
hugo new content/posts/hello-world/index.md
Open the created content/posts/hello-world/index.md and write your content:
+++
date = '2026-01-08T10:00:00+09:00'
draft = false
title = 'Hello, this is my first post!'
tags = ["first", "Hugo"]
+++

## Introduction

This site was built with Hugo and Cloudflare Pages.

## Future Plans

- Share development experiences
- Write technical tutorials
Testing Locally
Test locally before deploying:
hugo server -D
Visit http://localhost:1313 in your browser!
The
-Doption shows posts withdraft = true.
Tests passing? Time to push it to a repository.
Uploading to GitHub
Create a New Repository on GitHub
- Log in to GitHub
- Click + button in top right → New repository
- Repository name:
my-blog(or your preferred name) - Choose Public or Private
- Click Create repository
Connect Local Project
# Create .gitignore (exclude build output)
echo "public/" >> .gitignore
echo "resources/" >> .gitignore
echo ".hugo_build.lock" >> .gitignore

# Connect to GitHub repository
git remote add origin https://github.com/username/my-blog.git

# First commit & push
git add .
git commit -m "Initial commit: Hugo blog setup"
git branch -M main
git push -u origin main
Deploying with Cloudflare Pages
Access Cloudflare Dashboard
Log in to https://dash.cloudflare.com.
Create New Pages Project
Step 1: Click the + button in top right and select Pages.
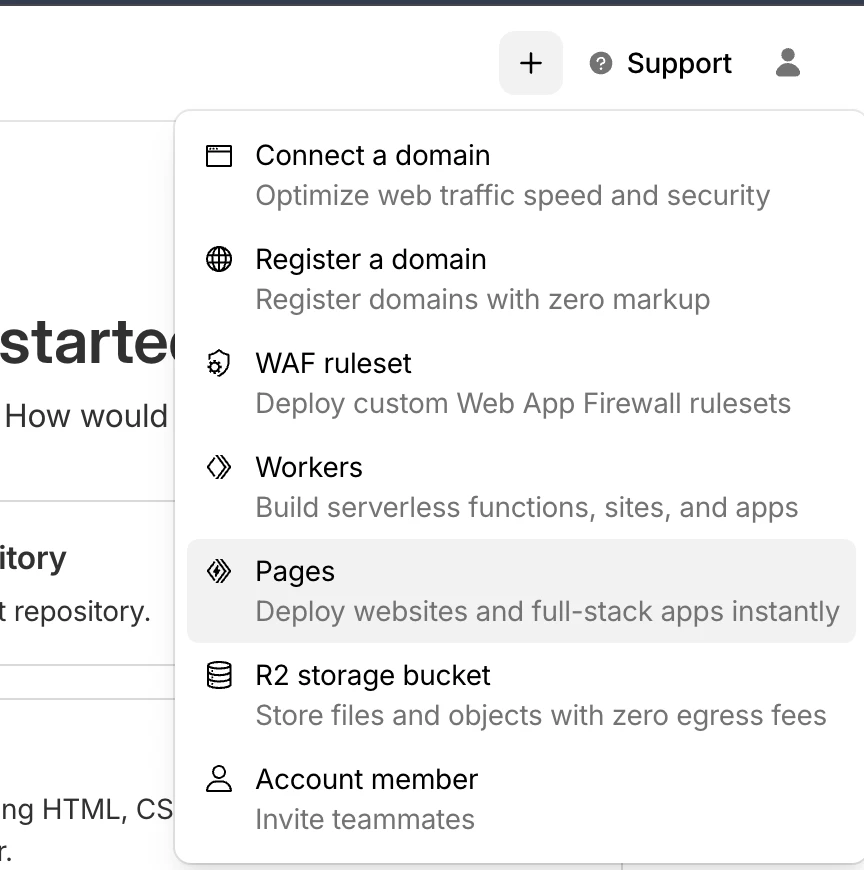 Select Pages from Cloudflare dashboard
Step 2: On the “Get started” screen, click Get started under Import an existing Git repository.
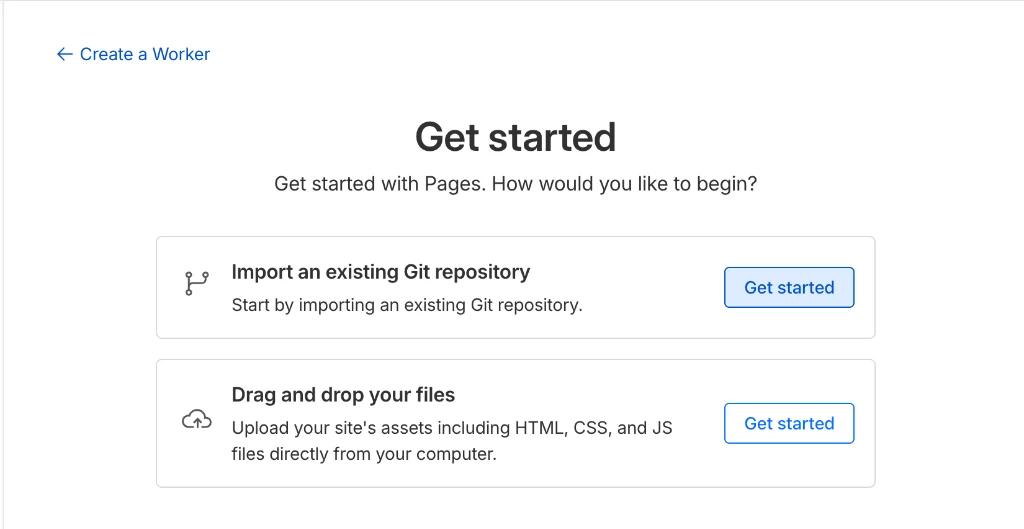 Select import Git repository option
Step 3: Connect your GitHub account and select the my-blog repository you just created.
First-time connection will show GitHub permission dialog. Click Authorize Cloudflare.
Build Settings
| Setting | Value |
|---|---|
| Framework preset | Hugo |
| Build command | hugo |
| Build output directory | public |
Important: In Environment Variables, set HUGO_VERSION to 0.154.3 (or your local version).
Start Deployment
Click Save and Deploy and the build will start automatically.
After a few minutes, you can access your site at https://projectname.pages.dev.
Conclusion
You’ve now got a completely free setup:
| Item | Cost |
|---|---|
| Hugo | Free |
| GitHub | Free |
| Cloudflare Pages | Free |
| SSL Certificate | Free |
| CDN | Free |
| Monthly Total | $0 |
Next Steps
- Connect custom domain (e.g., myblog.com)
- Add comment system (Giscus, Utterances)
- SEO optimization