TL;DR
- Script injection: Add the AdSense snippet to
layouts/partials/head/custom.html. - Ownership verification: Create
static/ads.txtwith your publisher ID. - Review: Once that’s done, wait for Google’s review and approval.
Table of contents
Getting AdSense Running on Hugo
Once you’ve built a blog with Hugo, integrating Google AdSense is the natural next step if you want the blog to sustain itself. But Hugo is a static site generator — it doesn’t have the one-click plugin setup you get with WordPress or Tistory. The configuration can feel unfamiliar at first.
When I started with Hugo, figuring out where exactly to drop the AdSense script inside the theme’s layout structure took some digging.
This post covers the setup I settled on for Hugo (specifically hugo-theme-stack) after actually running it on my blog. It’s the first post in the AdSense series, focused on the concrete steps.
 Wiring AdSense into a Hugo blog
Injecting the AdSense Code Snippet
The first thing AdSense approval requires is placing Google’s code snippet into your blog.
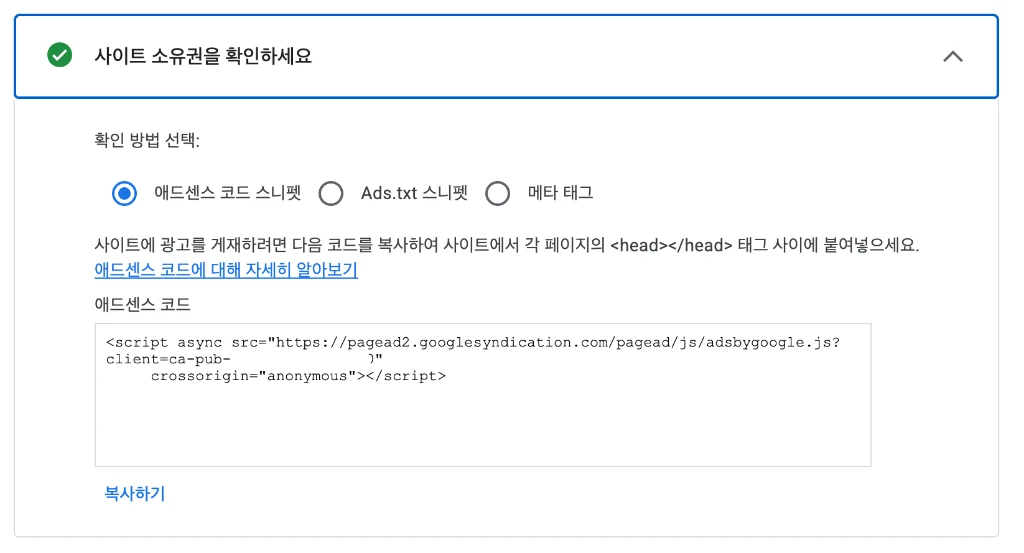 Copy this code from AdSense and embed it in your blog.
Hugo is a static site generator. There’s no plugin button to click like on WordPress. But once you know the pattern, it’s actually cleaner to manage.
Using a Custom Partial
If you’re on hugo-theme-stack, use the override method instead of touching the theme’s core files.
- Create a
layouts/partials/head/directory in your project root (skip if it already exists). - Create a
custom.htmlfile inside it. - Paste in the code AdSense gave you, unmodified.
<!-- layouts/partials/head/custom.html -->
<script async src="https://pagead2.googlesyndication.com/pagead/js/adsbygoogle.js?client=ca-pub-XXXXXXXXXXXXXXXX"
     crossorigin="anonymous"></script>
hugo-theme-stack picks this up automatically and drops it into <head> at build time. Update the theme later and the setting survives.
Proving Ownership with ads.txt
You’ve probably seen the “Earnings at risk — ads.txt file not found” warning on the AdSense dashboard. This file tells Google’s ad system: “this site is mine, send the revenue here.”
In Hugo, the static/ folder is special — anything you put there ends up at the site’s root (/) after build.
How to set it up:
- Go to the project’s
static/folder. - Create a file named
ads.txt. - Paste in the one-line partner info from Google:
google.com, pub-XXXXXXXXXXXXXXXX, DIRECT, xxxxxxxxxxxxxxxx
Once the ownership file is up, the setup side is done. Now it’s just waiting on Google.
Understanding the Review Process
Ads don’t show up the moment you save. Google runs a review process first, usually a few days, sometimes up to two weeks.
- Site under review: Google’s bots crawl the site to check policy compliance and content volume.
- Leave it alone: Don’t delete the AdSense code or overhaul the theme while under review — if the bot sees things changed mid-review, it can slow things down.
- Keep posting: Don’t stop publishing while you wait. Showing Google an active blog helps the odds. (
I definitely refreshed my inbox more than a few times during the wait.)
Once the Setup Is Done
The technical part ends here. What’s left is consistent posting. Paths can differ by theme, so drop a comment if you get stuck somewhere.
🔗 References
🔗 Full Series
- [AdSense #1] Hugo Blog AdSense Integration Guide (this post)
- [AdSense #2] Hana Bank Million Dollar Account & Fee Waiver Strategy
- [AdSense #3] Payment Method Registration & US/Singapore Tax Setup
- [AdSense #4] Reuniting with 10-Year-Old Earnings: The Final Payout Journey
- [AdSense #5] Transfer USD from Hana Million Dollar Account to Mirae Asset Securities, No Fee
- [AdSense #6] Finally Approved! Success on the Second Try